在本章中,我们将了解GraphQL的环境设置.要执行本教程中的示例,您需要以下 :
运行Linux,macOS或Windows的计算机.
网页浏览器,最好是最新版本的谷歌浏览器.
近期安装了Node.js的版本.建议使用最新的LTS版本.
安装了扩展GraphQL for VSCode的Visual Studio代码或您选择的任何代码编辑器.
如何使用Nodejs构建GraphQL服务器
我们将通过详细的逐步方法来构建带有Nodejs的GraphQL服务器如下所示 :
步骤1 : 验证节点和Npm版本
安装NodeJ后,使用终端上的以下命令验证节点和npm的版本 :
C:\Users\Admin>node -vv8.11.3C:\Users\Admin>npm -v5.6.0
第2步和第2步;创建项目文件夹并在VSCode中打开
项目的根文件夹可以命名为test-app.
使用visual studio代码打开文件夹编辑器使用下面的说明 :
C:\Users\Admin>mkdir test-appC:\Users\Admin>cd test-appC:\Users\Admin\test-app>code.
第3步和第3步;创建package.json并安装依赖项
创建一个package.json文件,该文件将包含GraphQL服务器应用程序的所有依赖项.
{ "name": "hello-world-server", "private": true, "scripts": { "start": "nodemon --ignore data/ server.js" }, "dependencies": { "apollo-server-express": "^1.4.0", "body-parser": "^1.18.3", "cors": "^2.8.4", "express": "^4.16.3", "graphql": "^0.13.2", "graphql-tools": "^3.1.1" }, "devDependencies": { "nodemon": "1.17.1" }}使用命令安装依赖项如下所示 :
C:\Users\Admin\test-app>npm install
步骤4 : 在数据文件夹中创建平面文件数据库
在此步骤中,我们使用平面文件来存储和检索数据.创建文件夹数据并添加两个文件 students.json 和 schools.json .
以下是 schools.json file :
[ { "id": "col-101", "name": "AMU", "location": "Uttar Pradesh", "rating":5.0 }, { "id": "col-102", "name": "CUSAT", "location": "Kerala", "rating":4.5 }]以下是 students.json 文件 :
[ { "id": "S1001", "firstName":"Mohtashim", "lastName":"Mohammad", "email": "mohtashim.mohammad@tutorialpoint.org", "password": "pass123", "collegeId": "col-102" }, { "id": "S1002", "email": "kannan.sudhakaran@tutorialpoint.org", "firstName":"Kannan", "lastName":"Sudhakaran", "password": "pass123", "collegeId": "col-101" }, { "id": "S1003", "email": "kiran.panigrahi@tutorialpoint.org", "firstName":"Kiran", "lastName":"Panigrahi", "password": "pass123", "collegeId": "col-101" }]步骤5 : 创建数据访问层
我们需要创建一个加载数据文件夹内容的数据存储区.在这种情况下,我们需要收集变量,学生和大学.每当应用程序需要数据时,它就会使用这些集合变量.
在项目文件夹中创建文件db.js,如下所示 :
const { DataStore } = require('notarealdb');const store = new DataStore('./data');module.exports = { students:store.collection('students'), colleges:store.collection('colleges')};步骤6 : 创建模式文件,schema.graphql
在当前项目文件夹中创建模式文件并添加以下内容 :
type Query { test: String}步骤7 : 创建解析器文件,resolvers.js
在当前项目文件夹中创建一个解析器文件并添加以下内容 :
const Query = { test: () => 'Test Success, GraphQL server is up & running !!'}module.exports = {Query}步骤8 : 去;创建Server.js并配置GraphQL
创建服务器文件并配置GraphQL如下 :
const bodyParser = require('body-parser');const cors = require('cors');const express = require('express');const db = require('./db');const port = process.env.PORT || 9000;const app = express();const fs = require('fs')const typeDefs = fs.readFileSync('./schema.graphql',{encoding:'utf-8'})const resolvers = require('./resolvers')const {makeExecutableSchema} = require('graphql-tools')const schema = makeExecutableSchema({typeDefs, resolvers})app.use(cors(), bodyParser.json());const {graphiqlExpress,graphqlExpress} = require('apollo-server-express')app.use('/graphql',graphqlExpress({schema}))app.use('/graphiql',graphiqlExpress({endpointURL:'/graphql'}))app.listen( port, () => console.info( `Server started on port ${port}` ));步骤9 : 使用GraphiQL运行应用程序和测试
验证项目test-app的文件夹结构如下 :
test-app / -->package.json -->db.js -->data students.json colleges.json -->resolvers.js -->schema.graphql -->server.js
运行命令npm start,如下所示 :
C:\Users\Admin\test-app>npm start
服务器在9000端口运行,因此我们可以使用GraphiQL工具测试应用程序.打开浏览器并输入URL http://localhost:9000/graphiql.在编辑器中输入以下查询 :
{ Test }来自服务器的响应低于 :
{ "data": { "test": "Test Success, GraphQL server is running !!" }}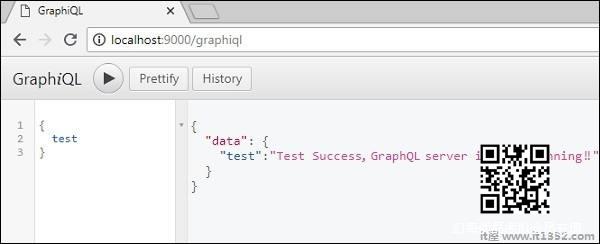
免责声明:以上内容(如有图片或视频亦包括在内)有转载其他网站资源,如有侵权请联系删除